
Top Tips for Optimizing Your Car Audio Ground for Better Sound Quality
Posted by Jacob Morris on Jun 5th 2026
Car Audio Ground: Getting a Good Ground for Clean, Reliable Power
The alternator ground is the best ground in the vehicle. In car audio, the goal is to make every ground path connect as cleanly as possible back to that alternator, engine block, chassis, and battery reference so your amplifier gets stable power instead of noise, voltage sag, or shutdowns.
Answer First: What Is the Best Ground in a Vehicle?
Think of the alternator ground as the master reference for all voltage in your car. The alternator case, engine block, battery ground wire, negative terminal, and main chassis ground cable form the most solid electrical return path in the vehicle.
Most installs cannot bolt an amp directly to the alternator, so the next best method is building a short, clean, low-resistance path to a strong chassis or frame point tied into that network.
-
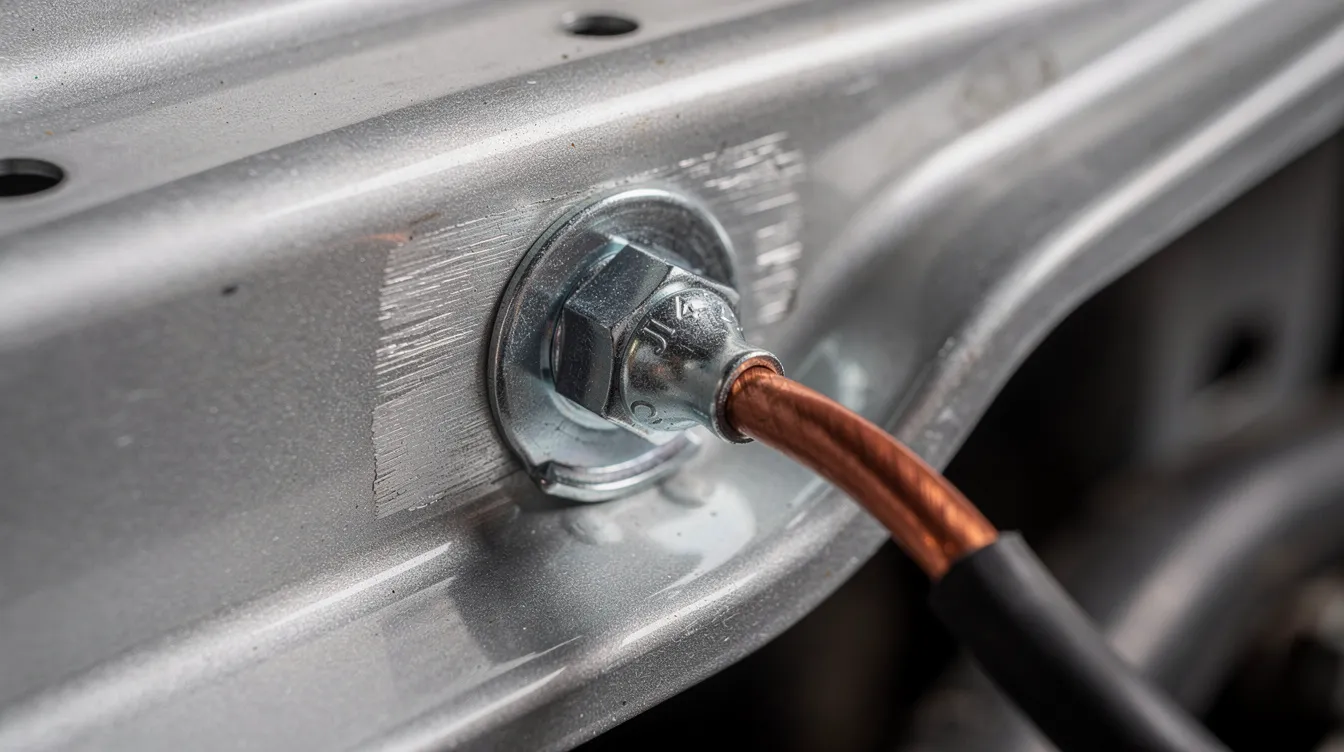
A proper ground connection completes the electrical circuit in car audio installations.
-
A good ground is short, bolted tight, and connected to bare metal.
-
Poor grounding creates electrical resistance that compromises audio system performance.
-
The negative battery terminal is a common grounding point.
-
Your ground wire should be treated with the same importance as your positive power wire.
-
If you want clean bass, do not bet your system on a random painted screw.
What Is a Dedicated / Absolute Ground in Car Audio?
A dedicated ground, sometimes called an absolute ground, is a purposely chosen, cleaned, and bolted connection point that ties into the main ground network instead of relying on an existing ground that may be weak, rusty, or shared with factory electronics.
-
It lowers resistance and helps prevent ground loops.
-
It improves voltage stability when bass notes hit.
-
It reduces alternator whine and speaker hums caused by ground loops.
-
In high-power builds, installers may run a dedicated ground cable to a main chassis point, battery negative, or rear battery bank.
-
A proper dedicated ground acts like an extension of the alternator and battery reference.
-
At Amped Up Car Audio, we treat grounds as seriously as power wire, especially for 2026+ Class D amplifier builds.
How the Vehicle Ground System Works (So You Don’t Fight It)
Power leaves the alternator or battery positive, runs through the amplifier or starter, then returns through the ground side of the circuit. If that return path is weak, the whole system suffers.
Main factory ground parts include:
-
Battery negative to chassis.
-
Battery negative to engine block.
-
Alternator case to engine block.
-
Engine-to-chassis straps.
-
Interior grounding points.
-
Frame and structural metal paths.
Modern 2010–2026 vehicles often have several ground straps, but paint, corrosion, heat, and loose connections can add resistance. For high-powered audio systems, upgrading factory grounding is recommended, even if the positive cable was already upgraded. This is why the Big 3 upgrade matters: alternator positive to battery positive, battery ground to chassis, and engine block to chassis.
Unibody Frame vs Full Frame Vehicles: Understanding the Difference for Car Audio Grounding
When choosing the best ground point for your car audio system, it's important to understand whether your vehicle has a unibody or full frame construction, as this affects grounding options and techniques.
What Is a Full Frame Vehicle?
Full frame vehicles, often trucks and older cars, have a separate, strong metal frame that supports the entire vehicle body. The frame rails provide excellent grounding points because they are large, solid, and typically free of paint or corrosion. Grounding to the frame rails in full frame vehicles is often the easiest and most reliable method.
What Is a Unibody Vehicle?
Unibody vehicles, common in modern cars and SUVs, integrate the body and frame into a single structure. This design reduces weight but means the chassis metal is thinner and sometimes coated with paint or undercoating, which can complicate grounding. In unibody vehicles, you must locate factory grounding studs or clean and sand a solid metal point on the chassis to ensure a good ground.
How to Identify Your Vehicle Type
-
Check the Owner’s Manual or Manufacturer’s Website: These often specify the vehicle’s frame type.
-
Visual Inspection: Look under the vehicle. If you see large, separate metal rails running the length of the vehicle, it’s likely full frame. If the undercarriage is flat and the body panels appear integrated with the frame, it’s probably unibody.
-
Ask a Professional: If unsure, a mechanic or car audio installer can quickly identify the frame type.
Understanding your vehicle’s frame type helps you choose the best grounding strategy, ensuring a stable, low-resistance path for your car audio system’s power return. Amped Up Car Audio can assist with identifying your vehicle’s frame and recommending the optimal grounding points for clean, reliable audio performance.
Choosing the Best Ground Point for Your Car Audio System
The best car audio ground point is electrically close to the alternator and battery network, physically close to the amplifier, and mechanically strong.
Checklist for Choosing the Best Ground Point:
-
Choose solid chassis points, frame rails in trucks, or factory grounding studs.
-
Ground wires should connect to a clean metal surface.
-
Avoid grounding to painted or rusted surfaces.
-
If there is paint, sand it to shiny bare metal before you install the ring terminal.
-
Location of grounding affects performance; use solid chassis points.
-
Ground cables should ideally be under 18 to 24 inches in length.
-
Grounding should be as short as possible to reduce noise.
-
Use the same gauge size for ground cables as for positive power wires.
-
Use a 4 AWG or larger wire for grounding amplifiers; 1/0 AWG OFC is common for 1500–3000+ watt RMS systems.
-
Run a direct battery ground wire for trunk-mounted batteries, extreme SPL builds, or when the chassis metal is thin or rusty.
-
Upgrade the OEM battery ground wire and alternator-to-chassis ground on any serious 1500+ watt RMS build.
Choosing Your Ground Route Based on Vehicle Frame Type
When deciding the best grounding route, your vehicle’s frame type plays a crucial role:
-
Full Frame Vehicles: These have a separate, sturdy metal frame ideal for grounding. Use the frame rails or factory grounding studs as your ground points. They provide a strong, reliable path close to the alternator ground network.
-
Unibody Vehicles: Since the body and frame are integrated and often coated with paint or undercoating, you must locate factory grounding studs or carefully sand down a clean metal spot on the chassis. In some cases, running a dedicated ground wire directly to the battery negative terminal or engine block is advisable to ensure a low-resistance path.
Understanding whether your vehicle is unibody or full frame helps you select the most effective grounding route, ensuring stable power and minimizing noise for your car audio system.
How to Test Your Grounds with a Multimeter (Step-by-Step)
Preparation
-
Before testing, disconnect the battery for basic inspection. For live voltage tests, keep your hand, wire, and meter leads clear of belts, fans, and hot parts under the hood.
-
Set your multimeter to DC volts.
Voltage Drop Test
-
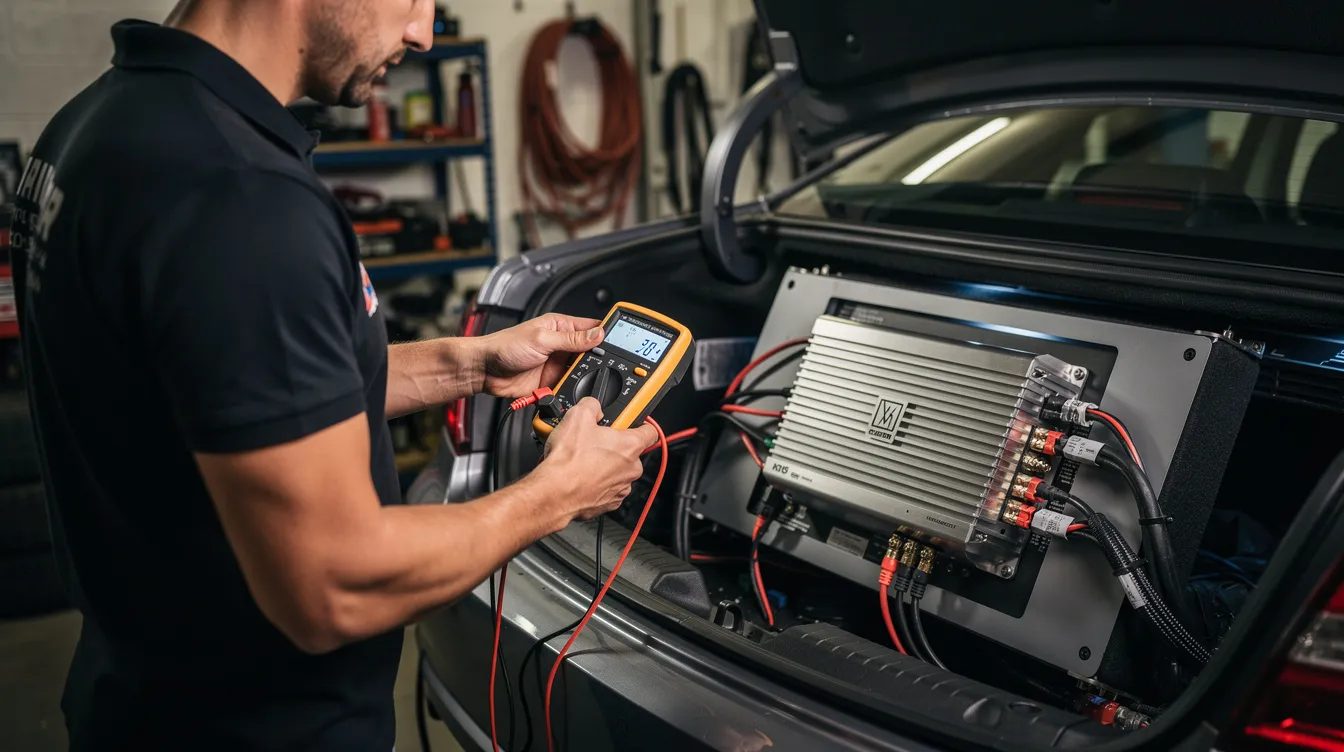
Measure battery voltage at the battery posts with the engine running.
-
Measure voltage at the amplifier positive and amplifier ground terminals.
-
Play a bass-heavy track at 50–70% volume.
-
A small drop of 0.2–0.4 V is normal.
-
Drops over 0.7–1.0 V under load usually mean a poor ground, undersized cable, or bad connector.
Resistance Check
-
To test ground voltage drop, place the black lead on the battery negative post and the red lead on the amplifier ground point.
-
Closer to 0 V is best; under about 0.2 V is a strong target.
-
Checking ground resistance with a multimeter is important for system performance, but voltage drop testing is usually easier and more accurate in-car.
-
Check factory engine-to-chassis and battery cables the same way.
Interpreting Results
-
If a cable is broken, corroded, hot, or green at the connector, change it.
Fixing Bad Grounds: Cleaning, Upgrading, and Rewiring
A weak ground can cause amplifier clipping when high power is demanded. High electrical resistance in grounding can lead to equipment damage, especially when the amplifier keeps trying to pull current through a bad path.
Common Symptoms
-
Intermittent bass.
-
Amp clipping at low volume.
-
Whining noise during acceleration.
-
Dimming headlights.
-
Hot ground cables or terminals.
Inspection Steps
-
Disconnect the battery negative first.
-
Unbolt the ground point and inspect the area.
Cleaning the Ground Point
-
Sand paint and rust until the metal is clean and shiny.
Upgrading Hardware
-
Use a high-quality ring terminal for grounding connections.
-
Use a star washer, proper bolt, nut, and a tight mechanical connection.
-
Apply dielectric grease on top of the finished joint to protect it from corrosion.
Rewiring and Upgrading
-
Add a new cable if the old factory run is too small, too long, or damaged.
-
Use quality OFC or pure copper battery cables; pure copper battery cables improve audio system efficiency.
Preventative Measures: How to Keep a Good Ground Good
A nice install can still fail later if vibration, salt, or heat attacks the connections.
-
Inspect ground cables every 6–12 months.
-
Keep wire away from sharp edges, exhaust, turbo piping, and moving parts.
-
Use a grommet if a cable passes through a hole.
-
Label main grounds and write a simple system layout.
-
Centralizing grounding for multiple components can prevent noise issues.
-
Use stainless hardware, serrated washers, and solid distribution blocks.
-
Upgrade the Big 3 before adding very high-power amplifiers.
Why Choose Amped Up Car Audio to Help With Your Ground & Power Issues?
Amped Up Car Audio is a specialty car audio retailer in Conover, NC, serving online buyers across the U.S.
We diagnose this sort of issue every day, from daily driver bass builds to competition subwoofer systems. Our team stocks OFC ground cable, battery ground wire upgrades, amp kits, batteries, ring terminals, and distribution hardware chosen to reduce voltage drop and noise.
If you are not sure where to place a ground, send us a picture, meter readings, and your amplifier model. We can help you find the source of the problem before you spend money on the wrong parts.
Website note: if www.ampedupcaraudio.com ever displays a security service page performing security verification, it verifies traffic for security, malicious bots, and bot filtering; after verification successful, if you are still waiting, respond ray id details to support so your account view can be checked.
Common Ground Mistakes We See Every Week
Frequent Grounding Errors
Here are the mistakes our installers routinely correct:
-
Using seat bracket bolts without sanding paint: move to a clean structural point.
-
Using self-tapping screws in thin sheet metal: use a factory stud or stronger frame area.
-
Running a ground wire much longer than needed: keep it short or increase cable size.
-
Using smaller ground wire than power wire: match the gauge.
-
Stacking too many terminals under one small bolt: use a distribution block.
-
Scattering amp, DSP, and head unit grounds around the car: consolidate them when possible.
-
Sharing audio grounds with noisy factory electronics: choose a dedicated ground.
-
Ignoring rust until there is an accident waiting to happen: protect exposed metal after the connection is made.
-
Assuming a close bolt is good: test it, because a pretty place may not be a good electrical point.
FAQ: Car Audio Ground, Battery Ground Wire & Troubleshooting
-
Q: Is the alternator ground really the best ground in the vehicle for car audio?
A: Yes. The alternator, engine block, chassis, and battery negative path are the true electrical reference for the vehicle. -
Q: Where should I attach my amplifier ground wire?
A: Use a short, thick, bare-metal chassis point near the amplifier, or run a dedicated cable to the battery or main ground stud. -
Q: Can I just use any bolt in the trunk as a ground?
A: No. Only use bolts connected to substantial metal with paint removed. -
Q: Do I need to upgrade my battery ground wire when I add a big amp?
A: For systems over roughly 800–1000 watts RMS, upgrading the battery ground cable and Big 3 wiring is strongly recommended. -
Q: How do I know if my ground is causing alternator whine?
A: Noise that rises with RPM usually points to ground loops, routing issues, or different ground potentials. -
Q: Is it better to ground multiple amps at the same spot or separate spots?
A: One solid common point usually keeps all amplifiers at the same reference. -
Q: When should I run a dedicated ground cable all the way to the battery?
A: Use that method for extreme power, rear batteries, rusty metal, or weak chassis paths.
Next Steps for a Stronger System
Next, read our guides on the Big 3 upgrade, choosing the right car audio battery, and amplifier wiring.
High-performance car audio systems often require dedicated batteries. 12V 100Ah LiFePO4 batteries are popular for car audio systems, LiFePO4 batteries offer over 15,000 deep cycles, and batteries should have a high discharge rate for optimal performance.
If you want us to look over your setup, reach out to Amped Up Car Audio with your vehicle, amplifier power, wire size, and a clear picture of each ground point. We will help you build a cleaner, safer, harder-hitting system.